Documenting dark room experiments
Explain the darkroom, chemicals etc.


|
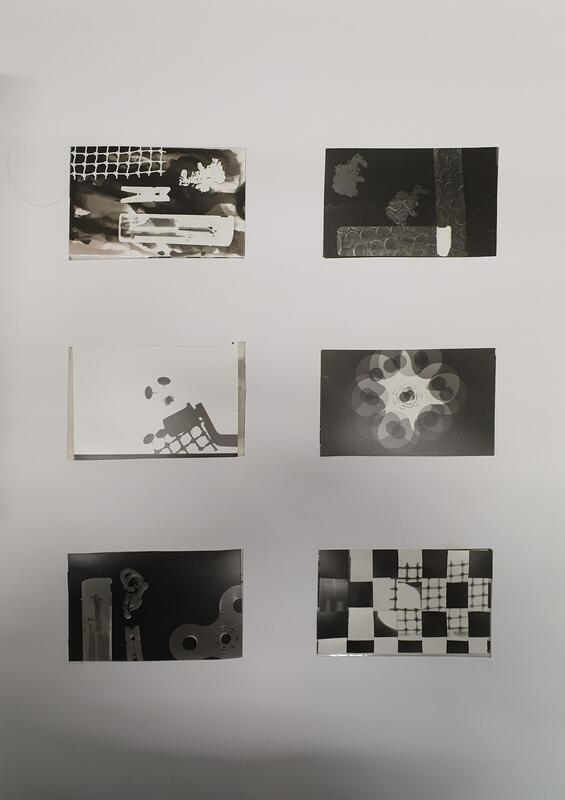
First we learnt the different stages to making a photogram e.g. exposing photographic paper to white light using an enlarger putting objects on top of the paper shiny side up to create an interesting image. Then we put the photographic paper into the developer a chemical that creates the image. The photographic paper is then left in the developer for 1 minute. Then using tongs you move the photo to the next chemical bath called stop (30 sec), which stops the image developing any further so the paper doesn't turn entirely black. Next is Fix (4 min) which will stop the paper from further developing when taken into white light so it can be brought outside and finally Wash (5 min) which is a bath of running water that clears the chemicals off the photo so it can be handled. The paper is then either hung up to dry or put through a dryer. We began experimenting different times and concentrations of light on the enlargers making test strips each lesson to find the perfect amount of time and light needed for a good photogram, we made test strips by taking black paper across the photographic paper while the light was on section by section.
Photogram Experiments 1

|


Pinhole Camera
The task was to demonstrate a camera obscura using tin cans to making camera's. The Pinhole cameras work by utilising a camera obscura, a small hole in the can projects the image taken upside-down along the back of the can. To make the Pinhole Camera's we cut off the top of a cans rim and sanded down any sharp edges. Then we measured some black card to fit the circumference of the can and cut even strips a couple inches into the card. We then proceeded to tape the card together so it tightly fit the cans and folded down all the strips and tapped them down using black duck tape to. create a completely black lid to ensure no light could reach the inside of the can. Next we used a pin to pierce a small hole slightly below the lid and placed a strip of electrical tape on top which could easily be pulled on and off to control if any light was entering the can.

While trying to take a photo of the corner of a building i found that my pictures often came out blurry since my hands weren't steady while taking the photo. I fixed this by finding a place to rest my pinhole camera as i took each photo.


|


All my pinhole photos's unfortunately included my finger and the electric tape which I can fix my being quicker. I found that about two seconds produced the clearest photos when it was very bright outside and when it was a little cloudy four seconds was more optimal, I worked this out with a lot of failed attempts.
|

|

|
Please include the following in the documentation of the pinhole camera task:
- An introduction to the task: eg. iIn this task I was required to...
- Explain what a pinhole camera is.
- Explain how you made your pinhole camera (see the dept website- attached)
- Include examples of your pinhole images. You should have a GOOD example of a corner of a building, view from a window and a portrait.
- Present each pinhole camera image with it's positive. (either create a sandwich print in the darkroom or use your phone)
- Annotate, www and ebi. Consider how light tight you made your image, how difficult / easy did you find creating a clear image that had contrast? Did you have to adapt your technique to achieve a better image? How did you manage the timings? Do you now have a good idea of the exposure times for different lighting conditions?
Documenting the SLR Camera
SLR stands for Single Lens Reflex camera because the camera has a single lens for viewing the picture and taking the photo so that the camera captures exactly what the photographer intended. The SLR camera does this by using mirrors to reflect the light to the photographer and when the photo is taken the mirror flicks up exposing the photographic paper to the light.
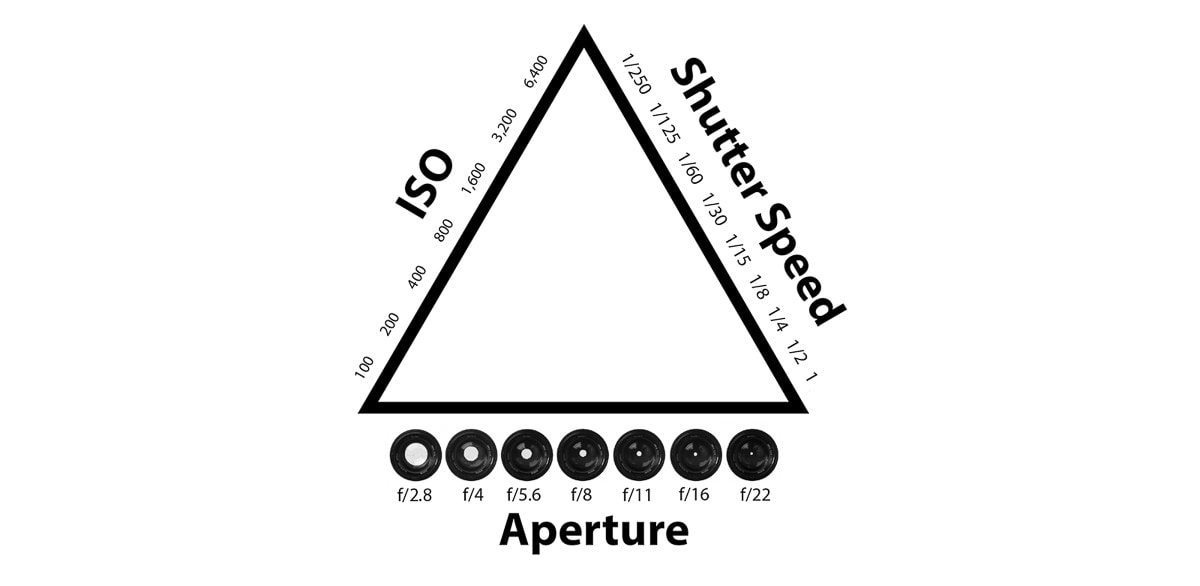
The exposure triangle.
The exposure triangle of the SLR camera includes the Shutter speed of the camera, the aperture, and the ISO/ ASA....
Shutter speed controls how long the photographic paper is exposed to light, the lower the number the shorter the time exposed
Aperture controls how much light enters the camera reaching the photographic paper, the higher the number the smaller the aperture.
ISO/ ASA is the type of photographic paper used if the number is lower then the paper is less sensitive to light and takes a little longer exposure time however it is good for taking portraits because they have a lot of light and it will result in a sharp detailed image. If the paper is of a higher number then it is more sensitive to light so they can be used in darker environments like night.
An image would help explain this.
We spent the lesson taking 22 photos using the sir cameras changing the shutter speed and the aperture with each phot separately to see what effect they had.
Processing the film
In pairs we went into the loading room which is completely pitch black to take the spools of film out from the SLR camera cassettes and roll them into the film reels. Next we placed out loaded film reels into a film tank and tightly shut the lid so no light could get in. We then took our film tanks into the dark room and placed 300ml of diluted developer into the tank very quickly and shook them up and down for he first 30 seconds and then once every 30 seconds for the next fie minutes. We then emptied the tanks and quickly filled them up with 300ml of diluted stop and shook for the first 30 seconds and for every 30 seconds 3 minutes after. Then we emptied that out and poured in the fix and shook that for the first 30 seconds and every 30 seconds for 5 minutes after. Next we took the film spools out and unraveled them to hang them to dry in the drying cupboard until next lesson.
We cut our films into strips of 6 and made a contact sheet out of them so we could see which we photo's we liked and wanted to enlarge. We made the contact sheet using a sandwich print.

After choosing 3 photos we wanted to enlarge we took the film that the photos were on into the dark room and placed our film shiny side down into the negative carrier creating a projection of the film with the light onto the photographic paper. I think I didn't leave them for one enough in the stop which gave them a yellow sepia tint. A good effort, a shame the light is bouncing off the images when you photographed them.

|

|

|
Tip for the future: make sure that you use subject specific vocab.
Foundation Assessment
Most tasks are carefully annotated and presented clearly on your weebly however, this was not always done on time. You clearly are incredibly able, however, are doing yourself a disservice by falling behind. Whilst you have managed to address this by the end of the project, you will not be able to sustain this for future projects.
Appropriate experimentation with the different processes (AO2). Annotation is clear and relevant (AO2). Some consideration of composition, particularly for the pinhole images where you have composed images that work well with the inherent distortion. (AO3)
